
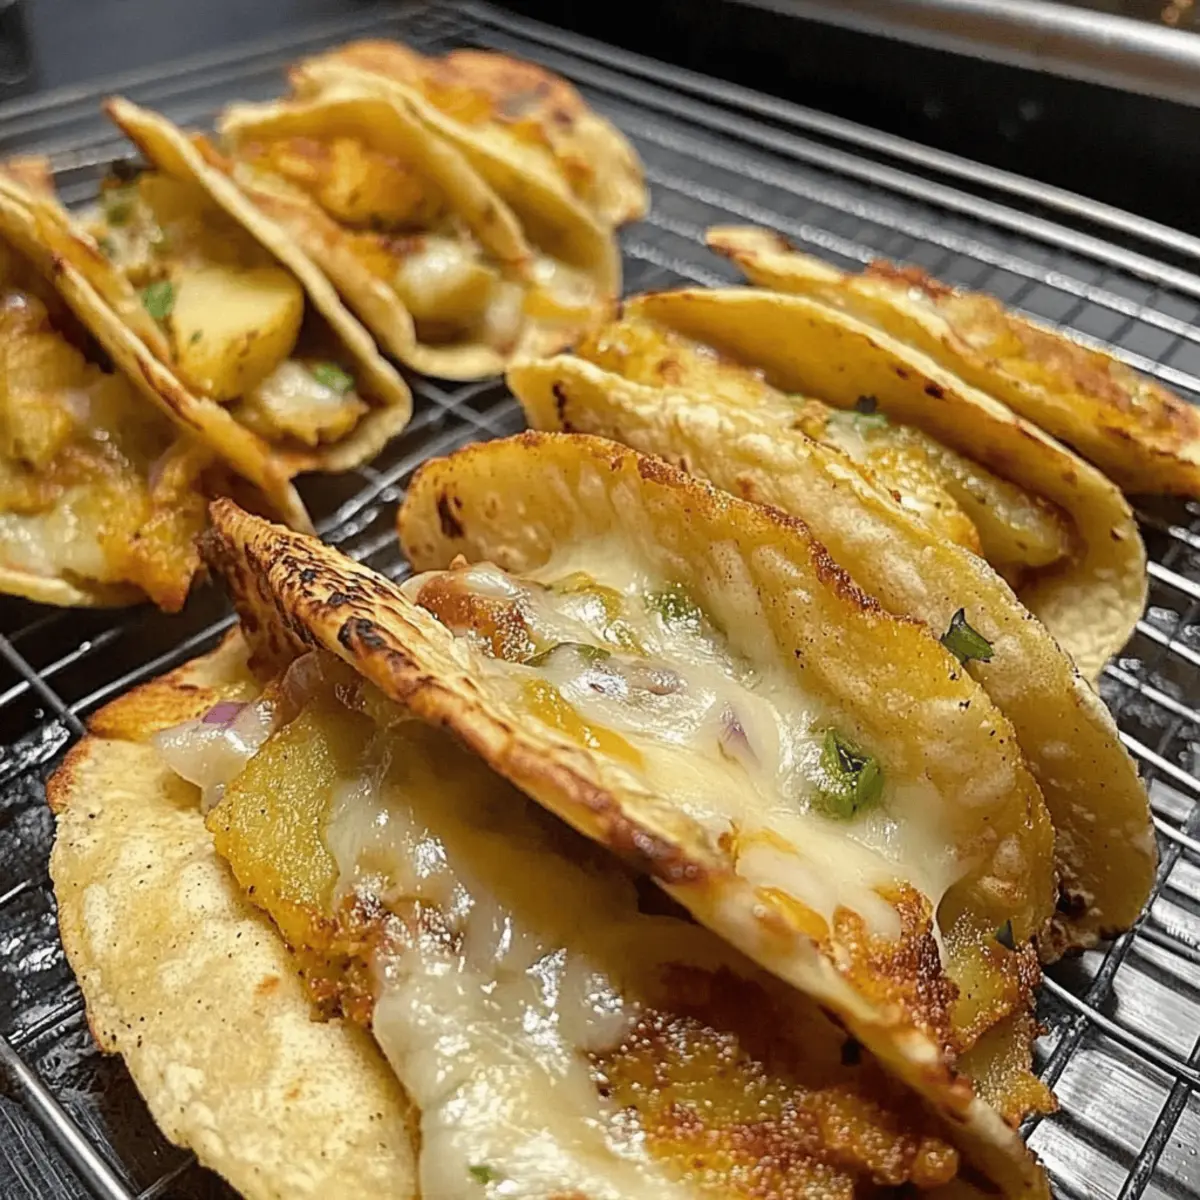
It was just another busy weeknight when I craved something comforting yet exciting—a far cry from my usual go-to takeout. That’s when I stumbled upon the idea of Crispy Potato Tacos with Zesty Green Chilies. These vibrant tacos capture the essence of both familiarity and adventure, as they merge crispy, seasoned potatoes with the zing of green chilies, creating a satisfying dish that’s also vegetarian. What I love most about these potato tacos is how they come together quickly, making them a perfect option for those hectic evenings. Plus, they let you enjoy the nostalgic feel of tacos while adding a hearty twist to your weeknight dinners. So, are you ready to bring your taco night to a whole new level? Let’s dive into this flavorful recipe!
Why Are Potato Tacos Irresistible?
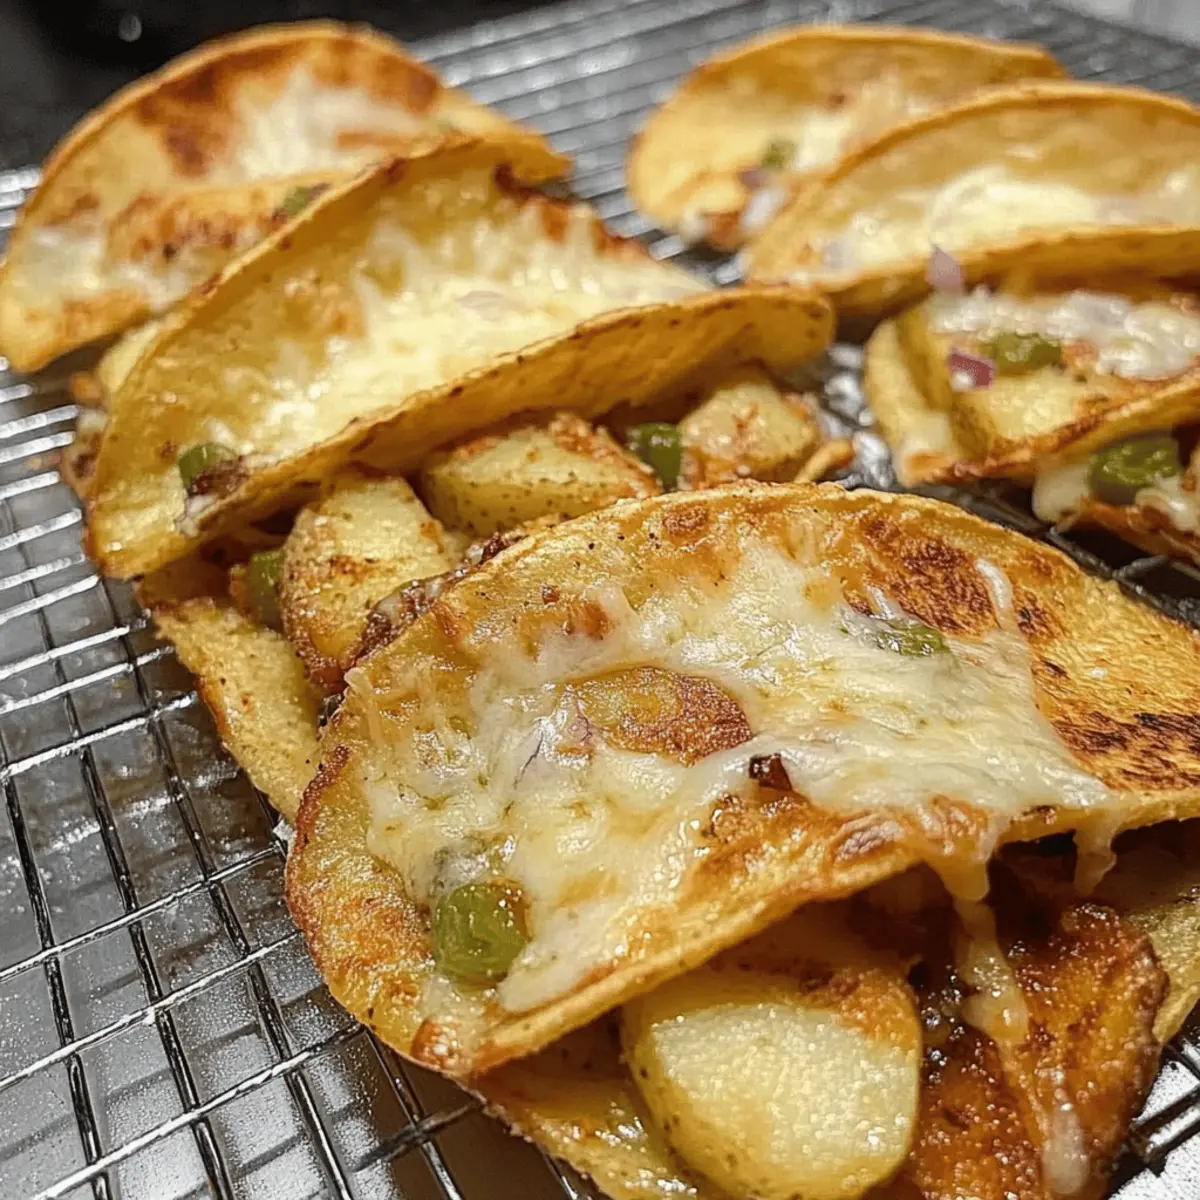
Crispy exterior: Enjoy the satisfying crunch that perfectly complements the tender potato filling.
Zesty kick: The addition of green chilies lends a delightful heat that elevates each bite.
Quick preparation: This recipe comes together in under 30 minutes, making it a weeknight winner.
Versatile ingredients: Customize further with toppings like sour cream or salsa for added flavor.
Crowd-pleaser: Ideal for both family dinners and gatherings, these tacos are sure to impress.
Transform your usual taco night with these Potato Tacos with Green Chilies, where comfort and excitement meet deliciously!
Potato Tacos with Green Chilies Ingredients
• A delicious mix for vibrant tacos!
For the Filling
- Russet Potatoes – Base ingredient; provides structure and heartiness—substituting with Yukon gold gives a creamier texture.
- Diced Green Chilies – Adds heat and a tangy kick; fresh green chilies can create a milder flavor profile.
- Red Onion – Sweetness and depth; use yellow onion if you prefer a different taste.
- Garlic – Essential aromatic component; enhances overall flavor without a direct substitute.
- Olive Oil – Fat source for sautéing that helps crisp the potatoes; vegetable oil also works well.
- Cumin – Warm spice that adds earthiness; coriander can substitute for a milder flavor.
- Paprika – Provides color and slight sweetness; try smoked paprika for a unique twist.
- Salt and Pepper – Essential seasonings to taste; adjust based on your personal preference.
For the Tacos
- Taco Shells – The perfect vehicle for the filling, holding the flavors beautifully; choose corn or flour shells based on dietary needs.
- Shredded Cheddar Cheese – Adds creaminess and flavor; opt for dairy-free cheese if needed.
- Sour Cream – Offers creaminess and a cooling contrast; Greek yogurt is a healthy alternative.
- Fresh Cilantro – Adds a bright, fresh garnish; parsley can be used if cilantro isn’t your favorite.
Bring the flavor of Potato Tacos with Green Chilies to your dinner table, and get ready for a delightful meal!
Step‑by‑Step Instructions for Potato Tacos with Green Chilies
Step 1: Prepare Potatoes
Start by peeling and dicing the russet potatoes into small, even cubes, about half an inch in size. This step ensures that they cook evenly and become crispy. Once chopped, rinse them under cold water to remove excess starch, then pat them dry with a kitchen towel to prevent excess moisture during cooking.
Step 2: Sauté Potatoes
Heat a generous amount of olive oil in a large skillet over medium heat. Once the oil shimmers (around 350°F), add the diced potatoes in a single layer. Sauté them for about 10-15 minutes, stirring occasionally until they’re golden brown and crispy on the outside. Season the potatoes with salt, pepper, cumin, and paprika, allowing the spices to coat them evenly.
Step 3: Add Flavors
Once the potatoes are crispy, stir in the diced green chilies, minced garlic, and chopped red onion. Continue to sauté the mixture for an additional 3-5 minutes, until the onion is tender and fragrant. The garlic should just start to turn golden at the edges, enhancing the overall flavor profile of your potato tacos with green chilies.
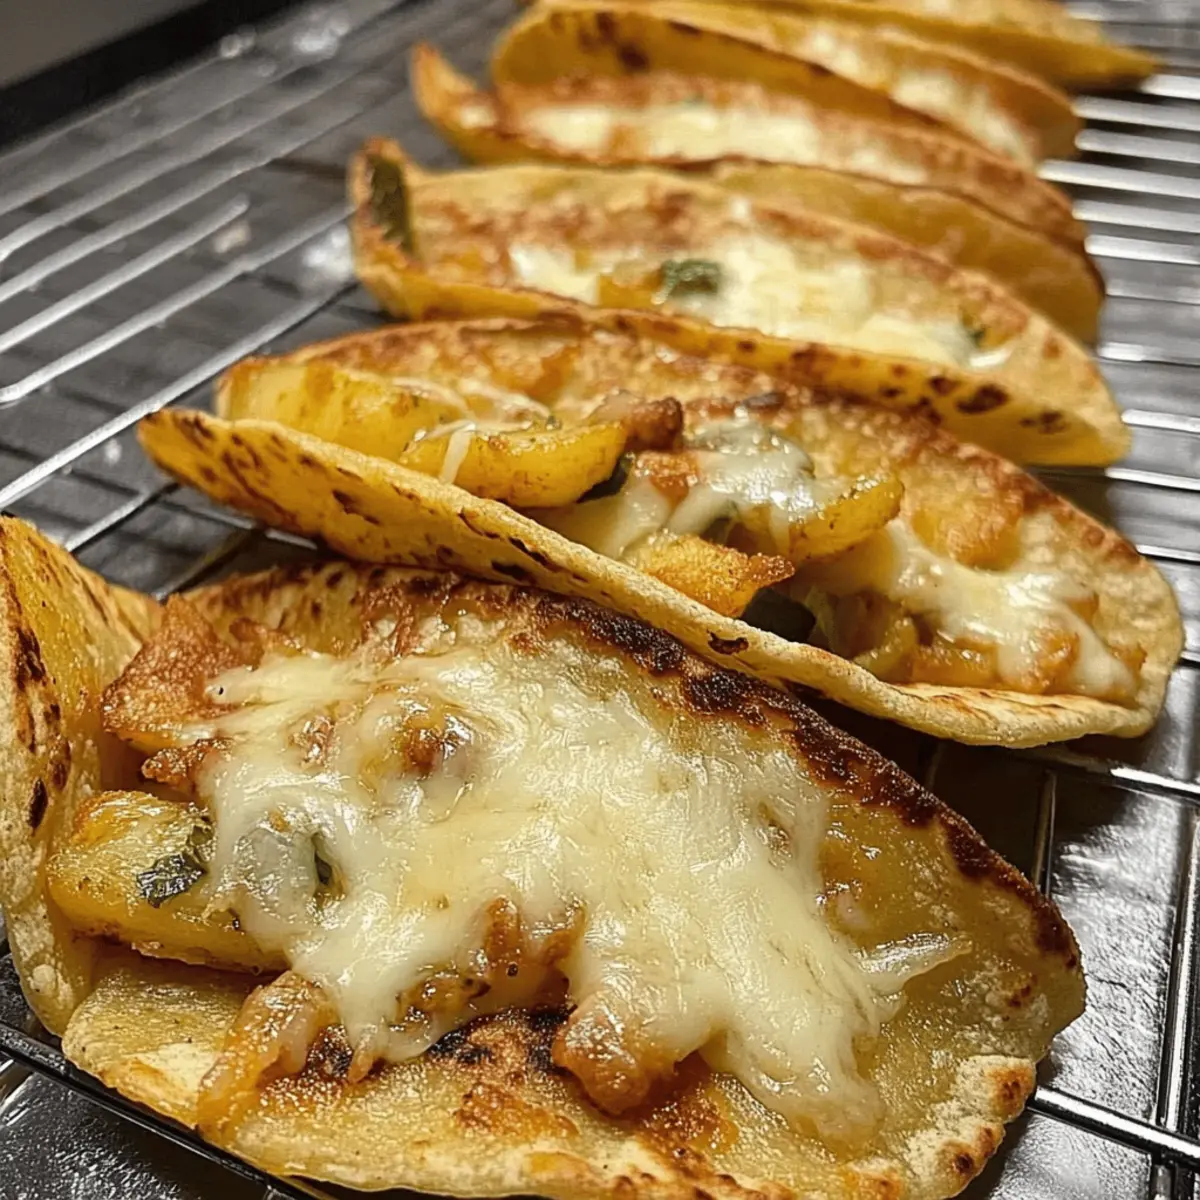
Step 4: Assemble Tacos
While the filling is cooling slightly, warm your taco shells in a separate skillet or in the oven at 350°F for about 5 minutes, or until heated through. Once warm, fill each taco shell generously with the potato mixture, ensuring each taco has a good balance of potatoes and chilies. Optionally, top with shredded cheddar cheese while the filling is still warm to allow it to melt slightly.
Step 5: Garnish
Before serving, sprinkle the freshly chopped cilantro over the tacos for a burst of freshness and color. This step not only enhances the presentation but also adds an aromatic layer that complements the savory filling beautifully.
Step 6: Serve
Plate your crispy potato tacos with green chilies while they’re hot, and serve them with a dollop of sour cream or Greek yogurt on the side if desired. This creamy contrast will elevate each bite, making these tacos a satisfying meal that’s perfect for busy weeknights.
Storage Tips for Potato Tacos with Green Chilies
- Fridge: Store leftover potato filling in an airtight container for up to 3 days. This keeps the flavors fresh and prevents drying out.
- Freezer: For longer storage, freeze the potato filling in a freezer-safe container for up to 2 months. Thaw in the fridge overnight before reheating.
- Reheating: Reheat the potato filling in a skillet over medium heat until warmed through, or microwave it in short bursts. Assemble with fresh taco shells when ready to serve.
- Assembly Tip: It’s best to store the taco shells separately to maintain their crispiness, filling them just before enjoying these Potato Tacos with Green Chilies.
Expert Tips for Potato Tacos
-
Even Dicing: Ensure the potatoes are diced evenly for consistent cooking. Uniform pieces will help achieve that perfect crunchy texture.
-
Perfect Crispiness: Sauté potatoes until golden brown; this not only enhances flavor but also locks in the crispy exterior. Avoid undercooking for the best result.
-
Aromatics Timing: Add garlic and onions after the potatoes are crispy. This allows the flavors to shine without burning, enhancing your Potato Tacos with Green Chilies.
-
Taco Shell Warmth: Warm your taco shells before filling them; this keeps them pliable and ready to hold all that deliciousness.
-
Multiple Toppings: Don’t shy away from customizing! Add toppings like avocado or lime for that extra burst of flavor in your tacos.
-
Batch Cooking: If making in advance, store the filling separately to keep everything fresh, and assemble right before serving for optimal taste.
Variations & Substitutions for Potato Tacos with Green Chilies
Feel free to explore these delightful twists that can enhance your taco experience with exciting new flavors!
-
Sweet Potato: Substitute russet potatoes with sweet potatoes for a sweeter, more vibrant filling that pairs beautifully with green chilies.
-
Black Beans: Add black beans to the filling for an extra layer of protein and a delightful texture that complements the potatoes.
-
Corn: Mix in some corn kernels for a pop of sweetness and added substance, making each bite even more satisfying.
-
Dairy-Free Cheese: Opt for a dairy-free cheese alternative if you want to keep things plant-based while still enjoying creamy goodness.
-
Smoky Flavor: Replace paprika with smoked paprika to introduce a rich, smoky depth that beautifully complements the spices and potatoes.
-
Fresh Herbs: Rather than cilantro, use chopped green onions or parsley for a different aromatic touch that can brighten the dish.
-
Spicy Kick: For those who crave more heat, add diced jalapeños or a dash of hot sauce into the potato mixture before filling your tacos.
-
Taco Shell Variations: Experiment with both corn and flour tortillas or try serving the filling in lettuce wraps for a fresh, low-carb alternative.
By combining these ideas, you can create your own special version of Potato Tacos with Green Chilies. And if you’re in the mood for more comforting dishes, consider pairing these tacos with a side of Cheesy Broccoli Bake or Garlic Butter Tacos for a truly satisfying meal!
Make Ahead Options
Preparing your Potato Tacos with Green Chilies ahead of time is a fantastic way to streamline your meal prep and save invaluable time during the week! You can make the potato filling up to 3 days in advance. Simply follow the first three steps, then allow the mixture to cool completely before transferring it to an airtight container and refrigerating it. To maintain the delicious, crispy texture, reheat the filling in a skillet over medium heat before assembling the tacos. When you’re ready to serve, warm up your taco shells (about 5 minutes in the oven at 350°F), and fill them with the reheated potato mixture, adding cheese and garnishes as desired for that fresh taste!
What to Serve with Potato Tacos with Green Chilies
Complete your taco night experience with delightful sides and drinks that enhance the comfort and excitement of your meal.
-
Creamy Guacamole: This rich dip adds a smooth, creamy texture that perfectly contrasts the crispy tacos while enhancing flavor.
-
Pico de Gallo: A fresh salsa featuring tomatoes, onions, and cilantro provides a zesty crunch that brightens every bite of your potato tacos.
-
Mexican Street Corn: Grilled corn brushed with lime and topped with cotija cheese offers a sweet and smoky flavor that beautifully complements the tacos.
-
Cilantro-Lime Rice: Fluffy rice garnished with cilantro and lime offers a refreshing side that balances the hearty filling of the tacos.
-
Black Bean Salad: This protein-rich salad adds a nutritious boost and a nice textural contrast, turning your meal into a wholesome feast.
-
Cold Beer or Margarita: Pairing with a light, crisp beer or a zesty margarita creates a festive atmosphere, enhancing your taco night experience.
Potato Tacos with Green Chilies Recipe FAQs
How do I choose the best potatoes for my tacos?
Absolutely! For the best texture, I recommend using russet potatoes due to their starchy nature, which provides the right structure and heartiness. If you prefer a creamier texture, Yukon gold potatoes are a fantastic alternative.
How should I store leftovers?
Store any leftover potato filling in an airtight container in the refrigerator for up to 3 days. This keeps the flavors intact and prevents the mixture from drying out. Ensure you keep taco shells separate; soft shells lose their crispiness when stored together.
Can I freeze the potato filling?
Very! To freeze the potato filling, allow it to cool completely, then transfer it to a freezer-safe container, ensuring it’s sealed tight to avoid freezer burn. It can last for up to 2 months. Thaw it in the fridge overnight before reheating.
What should I do if my potatoes are not crispy?
If your potatoes aren’t achieving that delightful crispiness, ensure they are cut into small, even pieces to promote even cooking. You may also need to increase the cooking time or temperature slightly—sometimes, they simply need a few extra minutes in the skillet until they turn that golden brown you want.
Are there any dietary considerations?
Certainly! This recipe is vegetarian and can be easily made gluten-free by using corn taco shells. If you’re concerned about dairy, you can replace the shredded cheddar cheese with a dairy-free cheese alternative, and Greek yogurt works well as a substitute for sour cream.
Can I customize the spice level?
For a milder flavor, opt for fresh green chilies instead of canned, which tend to be hotter. You can also adjust the amount of cumin and paprika used in the taco filling to suit your taste, adding a pinch or more based on how much warmth you want!

Potato Tacos with Green Chilies: Crispy Comfort in Every Bite
Ingredients
Equipment
Method
- Step 1: Prepare Potatoes - Peel and dice the russet potatoes into small cubes, about half an inch, rinse under cold water, and pat dry.
- Step 2: Sauté Potatoes - Heat olive oil in a large skillet over medium heat, add potatoes, and sauté for 10-15 minutes until golden brown and crispy, seasoning with salt, pepper, cumin, and paprika.
- Step 3: Add Flavors - Stir in the diced green chilies, minced garlic, and chopped red onion, continuing to sauté for another 3-5 minutes until the onion is tender.
- Step 4: Assemble Tacos - Warm taco shells separately and fill each with potato mixture, optionally topping with shredded cheddar cheese.
- Step 5: Garnish - Sprinkle freshly chopped cilantro over the tacos before serving.
- Step 6: Serve - Plate the tacos while hot, serving with sour cream or Greek yogurt on the side.
Leave a Reply