Table of Contents
Introduction
Braised chuck roast represents the epitome of comfort food, a dish that conjures images of family gatherings, cozy Sunday dinners, and the art of slow cooking. This culinary delight, revered for its rich flavors and tender texture, has graced tables for generations, becoming a staple in various cuisines around the globe. The process of braising—a low and slow cooking method—transforms the chuck roast, a relatively tough cut of meat, into a succulent masterpiece that effortlessly falls apart at the touch of a fork. In this ultimate guide, we will embark on a culinary journey to master the art of braising chuck roast.
From selecting the perfect cut to exploring the symphony of flavors and spices that elevate this dish, we’ll provide you with all the tips, tricks, and recipes you need to create a memorable meal that’s both nourishing and comforting. Whether you’re a seasoned chef or a novice in the kitchen, this guide will inspire you to embrace the art of braising and discover the unparalleled joy of cooking a perfect chuck roast.

Understanding Braised Chuck Roast
Braising chuck roast is a culinary technique that marries the robust flavors of beef with the gentle art of slow cooking. But what exactly is braising, and why does it work so well with chuck roast? Braising is a two-step cooking process that begins with searing the meat at a high temperature to develop a rich, caramelized crust. The meat is then gently simmered in a flavorful liquid at a low temperature for several hours, allowing the tough fibers to break down and become tender.
Why Chuck Roast?
The chuck roast, hailing from the shoulder area of the cow, is known for its rich marbling and connective tissues. While these characteristics make it tougher than more expensive cuts, they also make it ideal for braising. During the slow cooking process, the connective tissues melt into the meat, imbuing it with moisture and flavor that results in a tender, fall-apart texture that’s simply irresistible.
The Magic of Slow Cooking
Slow cooking through braising allows the flavors to meld together over time, creating a depth and complexity that cannot be achieved with quicker cooking methods. This slow transformation not only tenderizes the meat but also enriches the cooking liquid, turning it into a savory sauce that perfectly complements the roast.
The Importance of Meat Cuts
Not all cuts of beef are suitable for braising. The chuck roast stands out as the prime candidate due to its balance of fat, muscle, and connective tissue. Choosing the right cut is crucial for achieving the desired tenderness and flavor profile. When selecting a chuck roast, look for a piece with even marbling and a rich, red color, indicators of quality and freshness.
The Ultimate Guide to Mastering Braised Chuck Roast: Tips, Tricks, and Recipes
Course: MainCuisine: AmericanDifficulty: Medium8
servings19
minutes3
hours20
minutes450
kcalCreating a succulent braised chuck roast requires attention to detail and a respect for the process. Here’s a step-by-step guide, complete with ingredient measurements, to help you master this dish.
Ingredients
3 to 4 lb chuck roast
2 tablespoons olive oil
1 large onion, chopped
2 carrots, peeled and chopped
2 celery stalks, chopped
4 garlic cloves, minced
2 cups beef broth
1 cup additional beef broth
1 tablespoon tomato paste
3 sprigs fresh thyme
2 sprigs fresh rosemary
2 bay leaves
1 teaspoon paprika
Salt and freshly ground pepper, to taste
Directions
- Preparation: Begin by preheating your oven to 325°F (163°C). Pat the chuck roast dry with paper towels and season generously with salt and pepper.
- Sear the Meat: Heat the olive oil in a large Dutch oven over medium-high heat. Add the chuck roast and sear on all sides until a golden-brown crust forms, about 3-4 minutes per side. Remove the roast and set aside.
- Sauté the Aromatics: In the same pot, add the onion, carrots, and celery. Sauté until the vegetables begin to soften, about 5 minutes. Add the garlic and cook for an additional minute.
- Deglaze: Pour in the beef broth, scraping up any browned bits from the bottom of the pot. Stir in the tomato paste until well combined.
- Braise: Return the roast to the pot and add the thyme, rosemary, bay leaves, and paprika. Bring the liquid to a simmer, then cover the pot and transfer it to the preheated oven.
- Cook: Braise in the oven for about 3 to 4 hours, or until the meat is fork-tender.
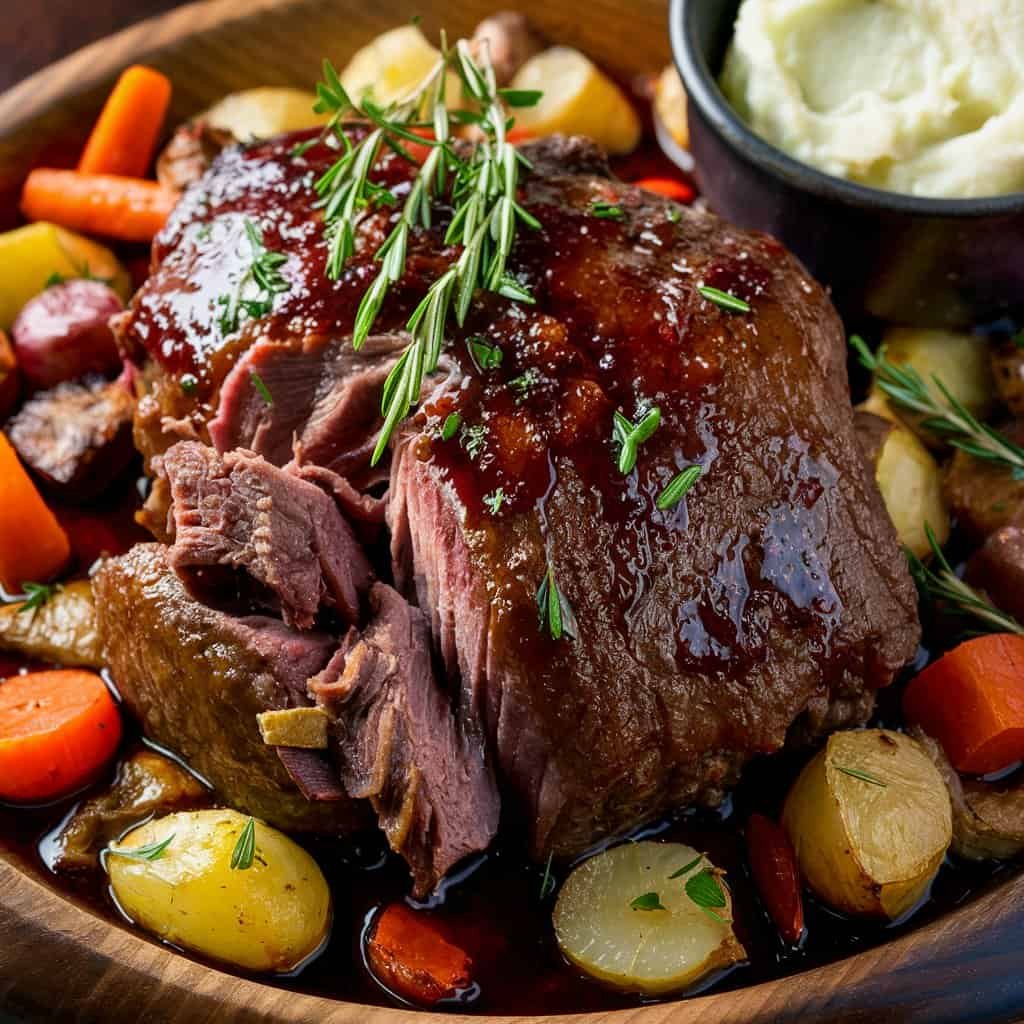
- Serve: Remove the bay leaves and herb sprigs. Allow the roast to rest for a few minutes before slicing. Serve with the braising liquid as a gravy.

Cooking Times and Temperatures
Achieving the perfect tenderness in a braised chuck roast is largely dependent on the cooking time and temperature. Here’s what you need to know to get it right every time.
The Low and Slow Rule
- Temperature: Braising is a low and slow cooking method, and maintaining the right temperature is key. A steady oven temperature of 325°F (163°C) is ideal for gently breaking down the connective tissues in the chuck roast, ensuring it becomes tender without drying out.
- Time: Cooking time can vary based on the size of the roast, but a general rule of thumb is to braise for about 3 to 4 hours. The meat is ready when it is fork-tender and easily pulls apart.
Knowing When It’s Done
- Visual Cues: The surface of the roast should have a rich, brown color, and the meat should shrink away from the bones (if bone-in). The braising liquid will have reduced and thickened into a flavorful sauce.
- Fork Test: Insert a fork into the center of the roast; it should slide in and out easily without resistance.
Serving Suggestions and Pairings
A beautifully braised chuck roast is a versatile dish that can be served in numerous ways, making it a perfect centerpiece for any meal.
Plating the Roast
- After cooking, let the roast rest for about 10 minutes before slicing. This allows the juices to redistribute, ensuring the meat is moist and flavorful.
- Slice against the grain to make each piece tender and easy to eat.
Accompaniments
- Starchy Sides: Serve your braised chuck roast with creamy mashed potatoes, buttery polenta, or fluffy rice to soak up the delicious braising liquid.
- Vegetables: Roasted root vegetables, steamed green beans, or a simple green salad complement the richness of the roast well.
Transforming Leftovers
- Leftover braised chuck roast can be shredded and used in sandwiches, tacos, or even as a hearty addition to soups and stews.

Conclusion
Mastering the art of braising chuck roast is more than just learning a cooking technique; it’s about embracing a tradition that has brought warmth and comfort to countless tables. This guide has walked you through the essential steps, from selecting the right cut of meat to serving your beautifully braised roast with the perfect accompaniments. We’ve shared tips, tricks, and insights to ensure your culinary journey is both successful and enjoyable.
As you venture into the kitchen to try your hand at this classic dish, remember that cooking is an act of love—a way to nourish both the body and the soul. Whether you’re preparing a meal for a special occasion or simply gathering your loved ones for a cozy dinner, the braised chuck roast is sure to impress and satisfy.
We at FitandEx are here to support you in your fitness and health journey, both in the gym and in the kitchen. May this guide inspire you to explore new flavors, refine your cooking skills, and enjoy the delicious rewards of your efforts.
Happy cooking, and here’s to many memorable meals ahead!

















14 Comments